
The expression engine: animate any property over TIME
How a Bluepic template becomes an animation. Every property is an expression, TIME is the only extra input, and ANIMATE turns keyframes into motion with straight or eased interpolation.
Looking for the visual, step-by-step version? Start with How to: build a video template in Studio. This article is the model underneath that workflow, for when you want to understand exactly what the timeline is writing.
Properties are expressions, not constants
In most template tools a property is a fixed number. x = 750. That is why those templates cannot move: there is nothing to animate.
In a Bluepic template, a property is an expression that is evaluated for every render. x might be 750, or 750 + logoWidth, or a function of your data. That is already what makes a template survive real content: when the text is longer than the placeholder, the expressions re-fit the layout instead of overflowing.
Animation adds exactly one thing to that model: a variable called TIME, in seconds. Evaluate the same expressions at TIME = 0, TIME = 0.04, TIME = 0.08, and so on across the clip, and the design moves. A video is the template sampled across a timeline it always had.
You build these expressions visually in Bluepic Studio; you rarely type them by hand. But understanding the model is what makes the rest of the platform make sense, so here is what is under the hood.
ANIMATE: a keyframe track
The workhorse is ANIMATE. You give it TIME and a list of keyframes, and it returns the value at that moment.
ANIMATE(TIME, keyframe, keyframe, keyframe, …)
A keyframe is a (time, value) pair. There are two kinds:
LINEAR(t, v)is a keyframe at timet(seconds) with valuev, reached by straight interpolation.CUBIC(t, v, x1, y1, x2, y2)is the same keyframe, but reached with a cubic-bezier easing curve (the four numbers are its control points, exactly like CSScubic-bezier).
Two rules are worth remembering:
- Interpolation happens between neighbours. Between two keyframes, the value moves from the earlier one's value to the later one's. The interpolation style (straight or eased) is set by the keyframe you are moving toward.
- The value holds at the ends. Before the first keyframe it stays at the first value; after the last keyframe it stays at the last value. Nothing extrapolates off into infinity.
Straight motion: LINEAR
Here is the headline text in the demo video. It starts off-screen to the left (-1500), slides in, holds, then slides back out. This is its translateX:
translateX = ANIMATE(TIME,
  LINEAR(2.31, -1500),   // holds off-screen until 2.31s
  LINEAR(2.85, 0),       // slides in: 2.31s to 2.85s
  LINEAR(7,    0),       // holds in place: 2.85s to 7s
  LINEAR(7.9,  -1500))   // slides back out: 7s to 7.9s
Read it as a track. Until 2.31 seconds the value is pinned at -1500 (the "before the first keyframe it holds" rule). From 2.31 to 2.85 it moves -1500 to 0. From 2.85 to 7 it stays at 0 (two keyframes with the same value is a hold). From 7 to 7.9 it moves back to -1500. After 7.9 it holds off-screen. The intro line above it runs the same track shifted a few tenths of a second earlier, so the two lines slide in one after the other.
Eased motion: CUBIC
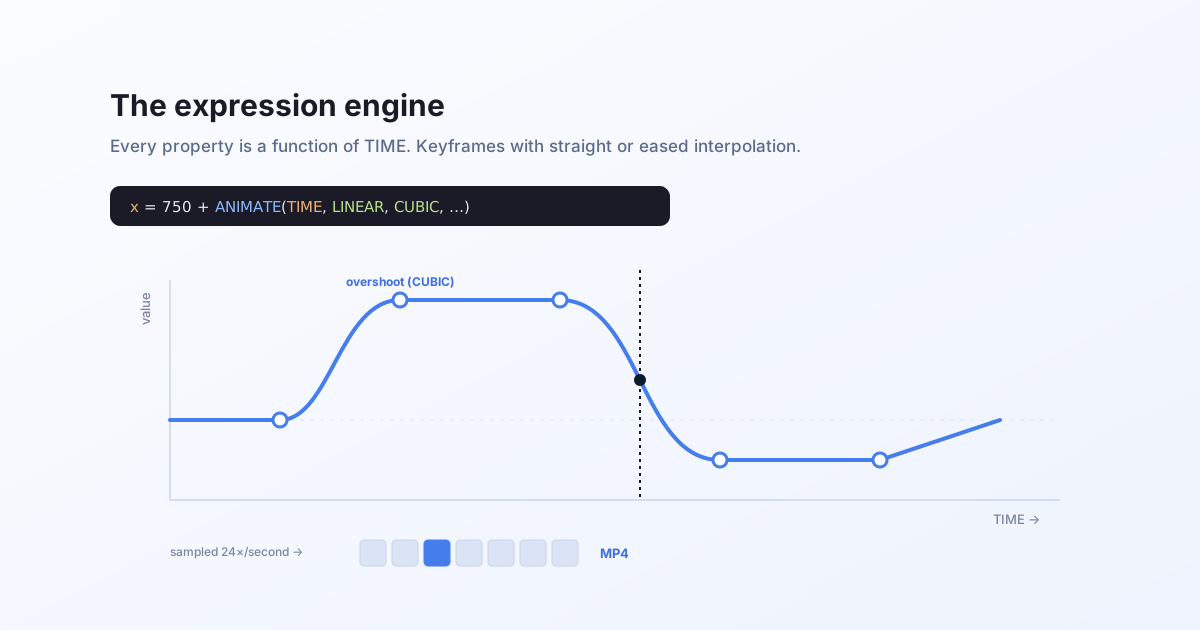
Straight motion looks mechanical. CUBIC gives it weight. Here is the speaker photo scaling up with a slight overshoot, then holding, then shrinking away:
width = 840 * ANIMATE(TIME,
  LINEAR(0.3, 0),                             // stays at 0 until 0.3s
  CUBIC(1.3, 1, 0.5, 0.5, 0.72, 1.66),        // pops to full size, overshooting past 1
  LINEAR(7, 1),                               // holds full size
  CUBIC(7.9, 0, 0.89, 0.28, 0.89, 0.28))      // eases back to 0
The value here runs from 0 to 1, and the whole thing is multiplied by 840, so width runs from 0 to 840. The CUBIC reaching 1 at 1.3s has a control point with y2 = 1.66: the easing curve briefly goes past its target, which is what makes the photo "pop" and settle instead of arriving flatly. That one number is the difference between a corporate fade and something that feels alive.
Composition: base + track, or base × track
Notice the two patterns above:
750 + ANIMATE(...)offsets a base position. The track oscillates around zero and rides on top of a fixed anchor. That is how the photo gently bobs±15pxaroundx = 750:x = 750 + ANIMATE(TIME, LINEAR(0, 0), CUBIC(2, 15, …), CUBIC(4, 0, …), CUBIC(6, -15, …), CUBIC(8, 0, …))840 * ANIMATE(...)scales a base size. The track runs from0to1and multiplies a dimension.
Because these are ordinary expressions, you compose them like any other math. And because every property is an expression, the same idea drives opacity, rotate, colour, and even text, not just position.
From expressions to frames
When you request format: "mp4", the engine samples these expressions at the template's frame rate. An 8-second clip at 24fps is 192 evaluations of the whole template, encoded into a video. Rendering is deterministic: the same TIME always produces the same frame, so the output is stable and cache-friendly at volume.
Two ways to see it for yourself:
- Scrub the /video playground. Dragging the timeline sets
TIMEand re-evaluates every expression live, in your browser. No render, no credits. - Freeze a frame over the API. Because
TIMEis just an input, you can render any single moment as a still by passing it indata:curl -X POST "https://api.bluepic.io/api/render" \ -H "Content-Type: application/json" \ -d '{ "templateId": "7ccf097c-10f2-4efc-bd03-8abe967c4711", "data": { "TIME": 1.3 }, "format": "png" }' \ --output pop.png
That gives you the photo mid-pop, at the 1.3-second mark.
Why this is the whole story
"Personalized video from a template" sounds like it needs a video pipeline. It does not. It needs properties that are functions of your data and one more axis, TIME, that they can also be functions of. That is the entire mechanism behind one template, two outputs: the still and the clip come from the same expressions, evaluated at one moment or across many.